
Why Homeowners Should Hire a Licensed Contractor for Vinyl Siding Installation
Why Vinyl Siding Installation Is a Professional Contractor Project
A successful vinyl siding installation depends on far more than fastening panels to an exterior wall. It requires accurate estimating, structural evaluation, moisture-control detailing, safe elevated work, and precise allowance for thermal movement. For most homeowners, these requirements make DIY vinyl siding installation a poor choice. A licensed exterior contractor is better equipped to inspect the sheathing, apply a continuous weather-resistive barrier, install starter strips and trim correctly, and hang interlocking panels without restricting expansion.
Before any physical work begins, a professional must calculate material quantities accurately. In the siding industry, exterior materials are quantified by the “square,” where one square equals 100 square feet of wall surface area. Estimating requires breaking the exterior elevations of a home into geometric shapes—rectangles, triangles, and parallelograms—while accounting for window and door openings. A 10% waste factor is typically added for off-cuts, gable angles, and overlapping panels. Complex rooflines or multi-story homes in communities across Silver Spring, MD, and Ellicott City, MD, often require a 15% allowance to cover irregular layout geometries. Underestimating materials can delay the project, while overbuying can waste hundreds or thousands of dollars.
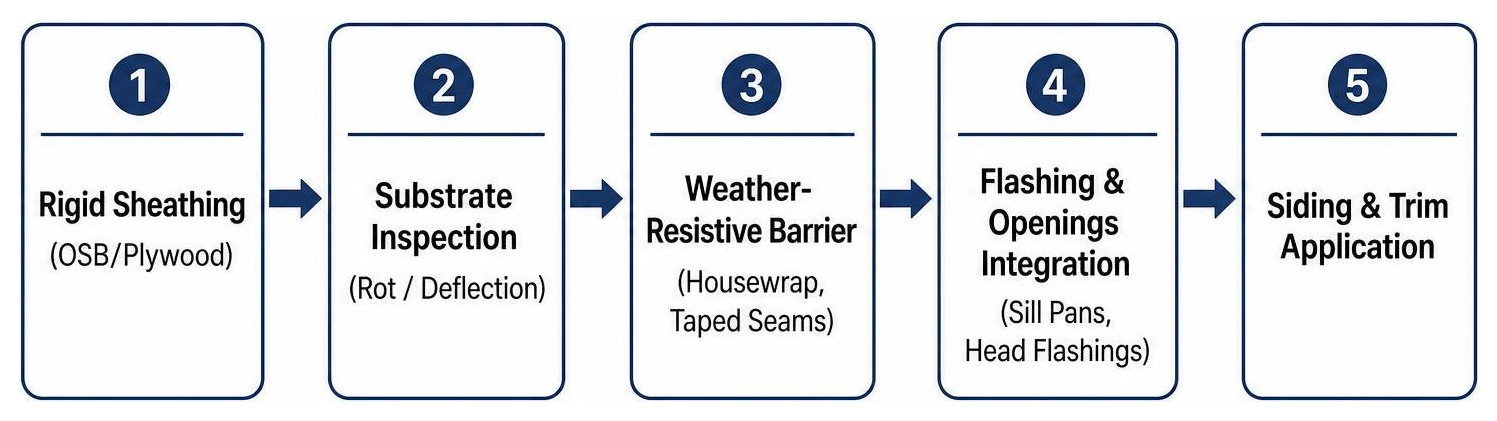
Evaluating structural substrates is just as important as measuring the exterior area. Homeowners who examine vinyl siding benefits often focus on curb appeal and minimal maintenance, but the performance of any cladding depends entirely on the backing surface. Vinyl siding cannot be installed directly over open wall studs; building codes require installation over a continuous, rigid sheathing layer such as exterior-grade plywood or oriented strand board (OSB). Substrates must be inspected for soft spots, water intrusion, rot, and structural sagging. A homeowner may miss these warning signs, but a licensed contractor can identify and correct them before new siding conceals the problem.
Specialized Tools Are Another Reason DIY Falls Short
Vinyl siding work requires trade-specific tools and the experience to use them without damaging the product. While general carpentry tools can handle basic layout tasks, vinyl profiling requires specialized equipment to prevent cracked hems, distorted locks, and water-channeling failures:
- Aviation and Tin Snips: Compound-action offset aviation snips are used for detailed cuts around trim accessories, utility penetrations, and interlock profiles without fracturing the vinyl hem.
- Utility Knife: Scoring blades can slice the vinyl surface cleanly, but wandering cuts or excessive pressure can ruin full panels.
- Circular Saw with Reverse Blade: Contractors often use a fine-toothed plywood blade mounted in the reverse direction for clean cross-cuts. In inexperienced hands, this method can shatter vinyl edges and create safety hazards.
- Snap-Lock Punch: This specialty tool creates raised tabs or “lugs” along a cut edge so the panel can lock into undersill utility trim beneath window sills and eaves.
- Nail Slot Punch: When cuts remove the factory nail hem, this tool creates elongated fastener slots so panels can still expand and contract freely.
- Folding Ruler and Chalk Line: Accurate reference lines keep courses level across wide elevations, but mistakes compound quickly across an entire wall.
| Tool Type | Professional Application | Why DIY Use Is Risky | Common Failure |
|---|---|---|---|
| Aviation Snips | Profile notches, trim cuts, intricate curves | Poor technique can crush or fracture the vinyl edge | Jagged cuts and weak lock points |
| Utility Knife | Straight rip cuts along panel lengths | Slippage can damage panels or injure the installer | Wandering cut lines and wasted material |
| Circular Saw (Reversed Blade) | Fast, square cross-cuts across multiple panels | Incorrect blade setup can shatter vinyl | Broken panels and projectile debris |
| Snap-Lock Punch | Top-edge modifications for eave and sill locks | Missing or misdirected lugs can prevent secure locking | Loose panels in high winds |
| Nail Slot Punch | Custom fastening slots on modified panels | Improper slots can pin the panel too tightly | Buckling from restricted expansion |
Moisture Barriers Require Professional Detailing
Vinyl siding is a protective, ventilated exterior rainscreen, not an impermeable, watertight barrier. Water can penetrate vinyl overlaps and trim channels during wind-driven rain. That means the wall assembly’s true water resistance depends on the underlying weather-resistive barrier (WRB), flashing tape, and drainage plane.
A licensed contractor applies a continuous, code-approved WRB over rigid sheathing, shingling sheets horizontally with proper overlaps and sealing seams with approved tape. Flashing must be integrated at rough openings in the correct order so water drains outward rather than into the wall cavity. On older residential properties in Baltimore County, MD, and Montgomery County, MD, uneven exterior walls may also need 1×3-inch treated furring strips spaced 16 inches on center to create a flat plane. This stage is also the right time to review home insulation levels and determine whether rigid foam backerboards can reduce thermal bridging and improve comfort.
Essential Rules of Vinyl Siding Installation
Polyvinyl chloride (PVC) cladding responds dynamically to changes in ambient temperature. A standard 12-foot-6-inch vinyl panel can expand and contract by 1/2 inch or more across typical Mid-Atlantic seasonal temperature swings. If an installer ignores this thermal movement, the siding will warp, ripple, or pull away from fastener locations.
To preserve the cladding system’s structural integrity, professional installers follow strict installation guidelines, such as those outlined in the VSI Installation Manual:
- Never Face-Nail Panels: Fasteners must be driven exclusively through the center of the pre-punched factory nailing slots. Driving a nail through the face of the panel pins the vinyl permanently to the wall, causing it to buckle as temperatures climb.
- Maintain Clearance Under Fastener Heads: Nails must not be driven flush against the vinyl hem. A 1/32-inch clearance—approximately the thickness of a dime—must remain between the fastener head and the panel hem. Panels should hang freely from their fasteners rather than being clamped tightly to the sheathing.
- Drive Fasteners Straight and Level: Fasteners driven at an angle distort the nailing hem, pinching the vinyl panel against the substrate and restricting its horizontal movement.
- Use Corrosion-Resistant Fasteners: All fasteners must be aluminum, stainless steel, or hot-dipped galvanized roofing nails with a minimum 5/16-inch head diameter and a 1/8-inch shank. Fasteners must penetrate at least 1 1/4 inches into solid, nailable wood framing or sheathing.

Fastener Spacing and Temperature Expansion Allowances
Proper fastening layout and thermal expansion tolerances are critical to a durable installation. When fastening horizontal siding panels, nails must be spaced no more than 16 inches apart on center into structural studs. Vertical panels and specialized architectural accessories require fasteners spaced 12 inches on center, while corner posts and vertical trims demand fastener intervals of 8 to 12 inches.
Thermal expansion tolerances must be calibrated to the ambient temperature at the time of installation. In temperatures above 40°F, installers must leave a 1/4-inch expansion gap at all accessory junctions, including inside corner posts, outside corner posts, and J-channels. When working in temperatures below 40°F, PVC becomes brittle and contracts toward its minimum dimension; installers must expand these gaps to 3/8 inch. Failing to account for cold-weather contraction will cause panels to push against trim channels and buckle when summer temperatures rise.
Installing Starter Strips, Corner Posts, and J-Channels
The starter strip establishes the horizontal alignment for the entire exterior elevation. To install it properly:
- Locate the lowest corner of the existing wall sheathing using a transit or line level.
- Snap a level chalk line around the home’s perimeter, measuring upward from the lowest point by an amount equal to the starter strip’s width minus 1/4 inch.
- Fasten starter strips along this line at 10-inch intervals, leaving a 1/4-inch space between adjacent strip sections to accommodate horizontal thermal expansion.
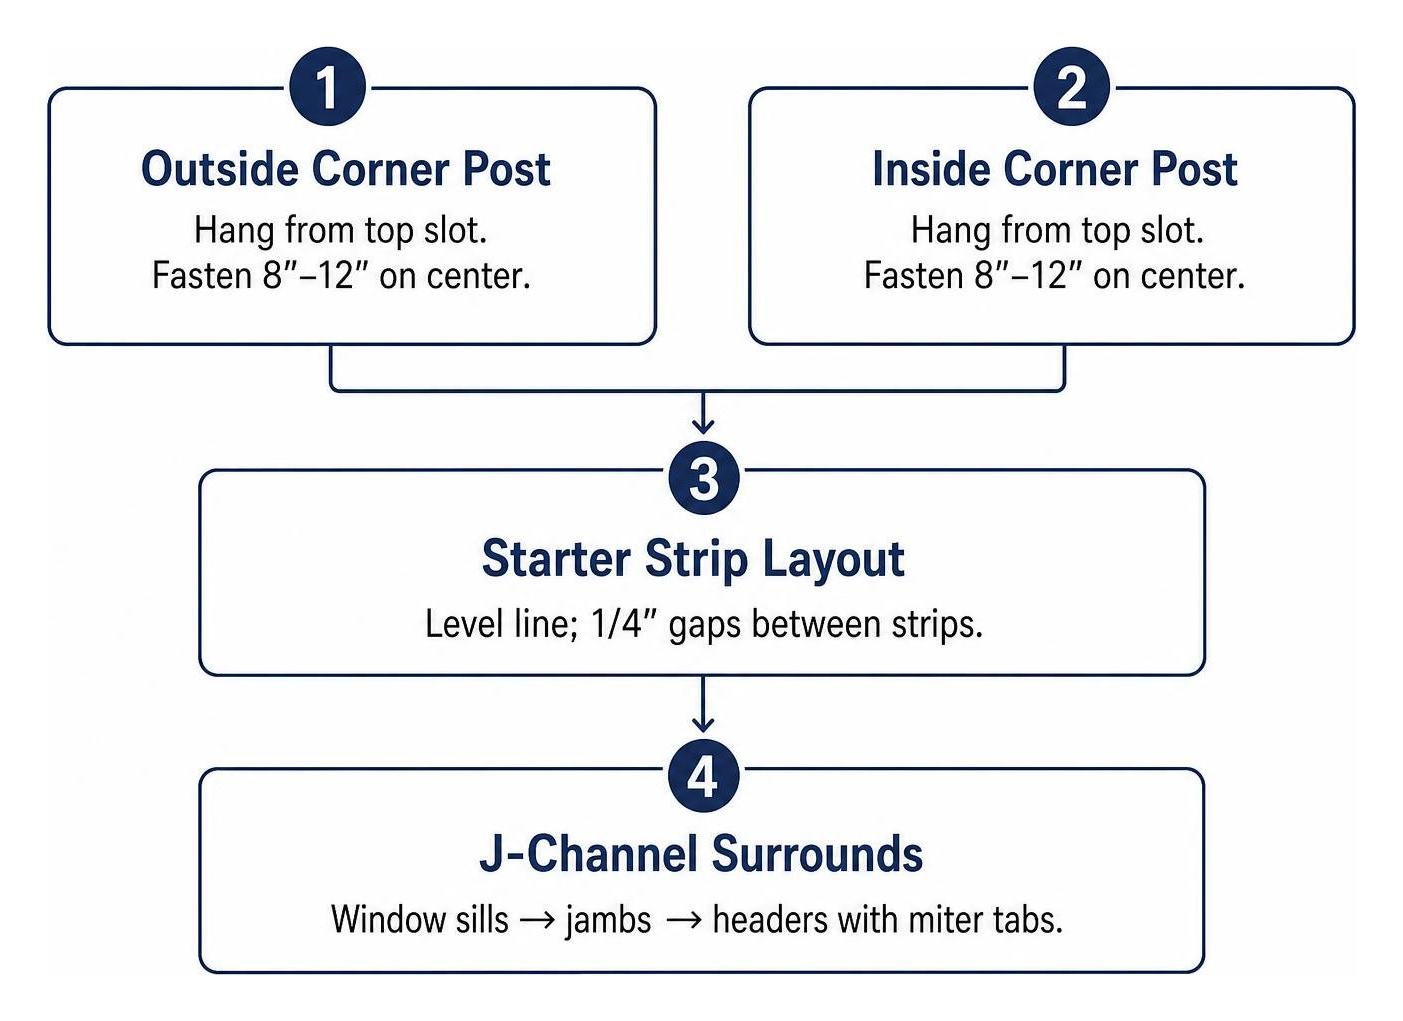
Corner posts require careful vertical alignment. Outside and inside corner posts must extend 1/4 inch below the bottom edge of the starter strip and stop 3/8 inch short of the eaves or soffit channels. Fasten corner posts at the very top of the uppermost nailing slot to hang the accessory vertically, then place subsequent fasteners in the center of slots every 8 to 12 inches. If splicing corner posts on multi-story structures, cut away 1 inch of the nailing hem on the upper post and overlap it over the lower post by 3/4 inch, leaving a 1/4-inch gap for thermal expansion.
J-channels around windows and doors require precise water-management detailing. First, install an undersill J-channel flush across the bottom of the window frame. Next, install side jamb channels, extending their profiles past the sill trim. Finally, install the header J-channel, cutting 3/4-inch drain tabs into both ends and folding them down into the side jamb channels. This detailing directs water runoff around the window frame and down the exterior drainage plane.
Step-by-Step Process: Hanging Panels, Lapping, and Trim Work
Hanging siding panels requires a steady rhythm and careful attention to mechanical tolerances. Working from the starter strip up to the eaves, engage the bottom hook of the initial panel into the starter strip lip. Gently push the panel upward until the lock engages along its full length. Do not pull the panel upward with excessive force; stretching the vinyl distorts the lock geometry, binds the panel, and produces uneven, wavy courses across the wall elevation. Homeowners can review how to avoid home siding problems to see why balanced, unstressed panel engagement is critical to long-term performance.

Lapping Panels and Cutting Around Wall Openings
Field joints between horizontal siding panels must be overlapped by 1 inch. Laps should be staggered by at least 3 feet between successive courses to prevent aligned seams, which compromise structural strength and look unappealing. Panels should also be lapped away from primary sightlines and high-traffic areas—such as front walkways and patios—to keep joint edges inconspicuous from main vantage points.
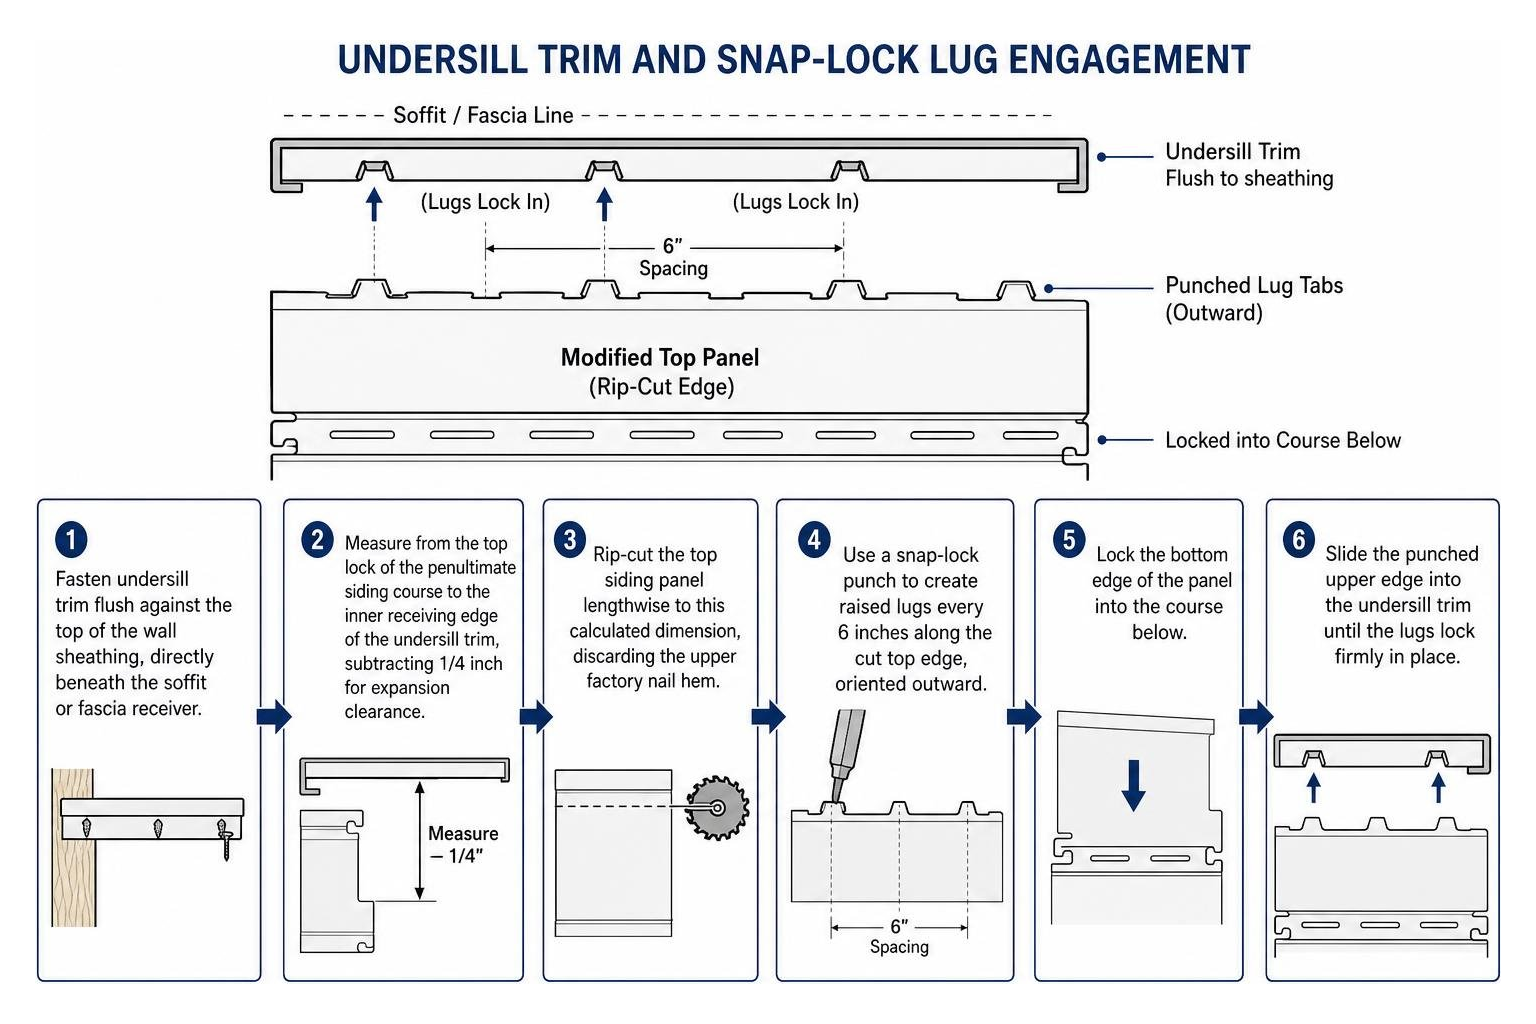
When fitting panels around window openings, leave a 1/4-inch clearance (or 3/8-inch in cold weather) between the panel ends and the J-channel stops. For panels running beneath window sills, measure the opening depth, add the expansion tolerance, and cut away the excess material using offset aviation snips. Use a snap-lock punch to create raised lugs every 6 inches along the newly cut horizontal edge, facing the lugs outward toward the street. Once the lower lock is engaged, push the modified panel upward until the punched lugs click into the pre-installed undersill trim.
Finishing the Top Row and Gable Transitions
Terminating the final siding course beneath eaves or rakes requires custom panel modifications:
- Fasten undersill trim flush against the top of the wall sheathing, directly beneath the soffit or fascia receiver.
- Measure the distance from the top lock of the penultimate siding course to the inner receiving edge of the undersill trim, subtracting 1/4 inch for expansion clearance.
- Rip-cut the top siding panel lengthwise to this calculated dimension, discarding the upper factory nail hem.
- Use a snap-lock punch to create raised lugs every 6 inches along the cut top edge, oriented outward.
- Lock the bottom edge of the panel into the course below, then slide the punched upper edge into the undersill trim until the lugs lock firmly in place.
Gable end transitions follow a similar methodology. Install J-channels along the gable rakes to receive panel ends. Cut panels to match the roof pitch angle using a reversed circular saw blade or aviation snips. Maintain a 1/4-inch expansion gap (3/8-inch in cold weather) between the angled cuts and the receiving channel. Fasten each gable panel through the center of its remaining nail slots, never pinning the panel apex directly through the face of the vinyl.
The Hidden Risks of DIY vs. Hiring a Licensed Contractor
Vinyl siding installation appears deceptively straightforward on video tutorials, leading many homeowners to attempt it themselves. However, it remains one of the most mechanically sensitive exterior trades. Minor installation mistakes can trigger complex structural issues over time:

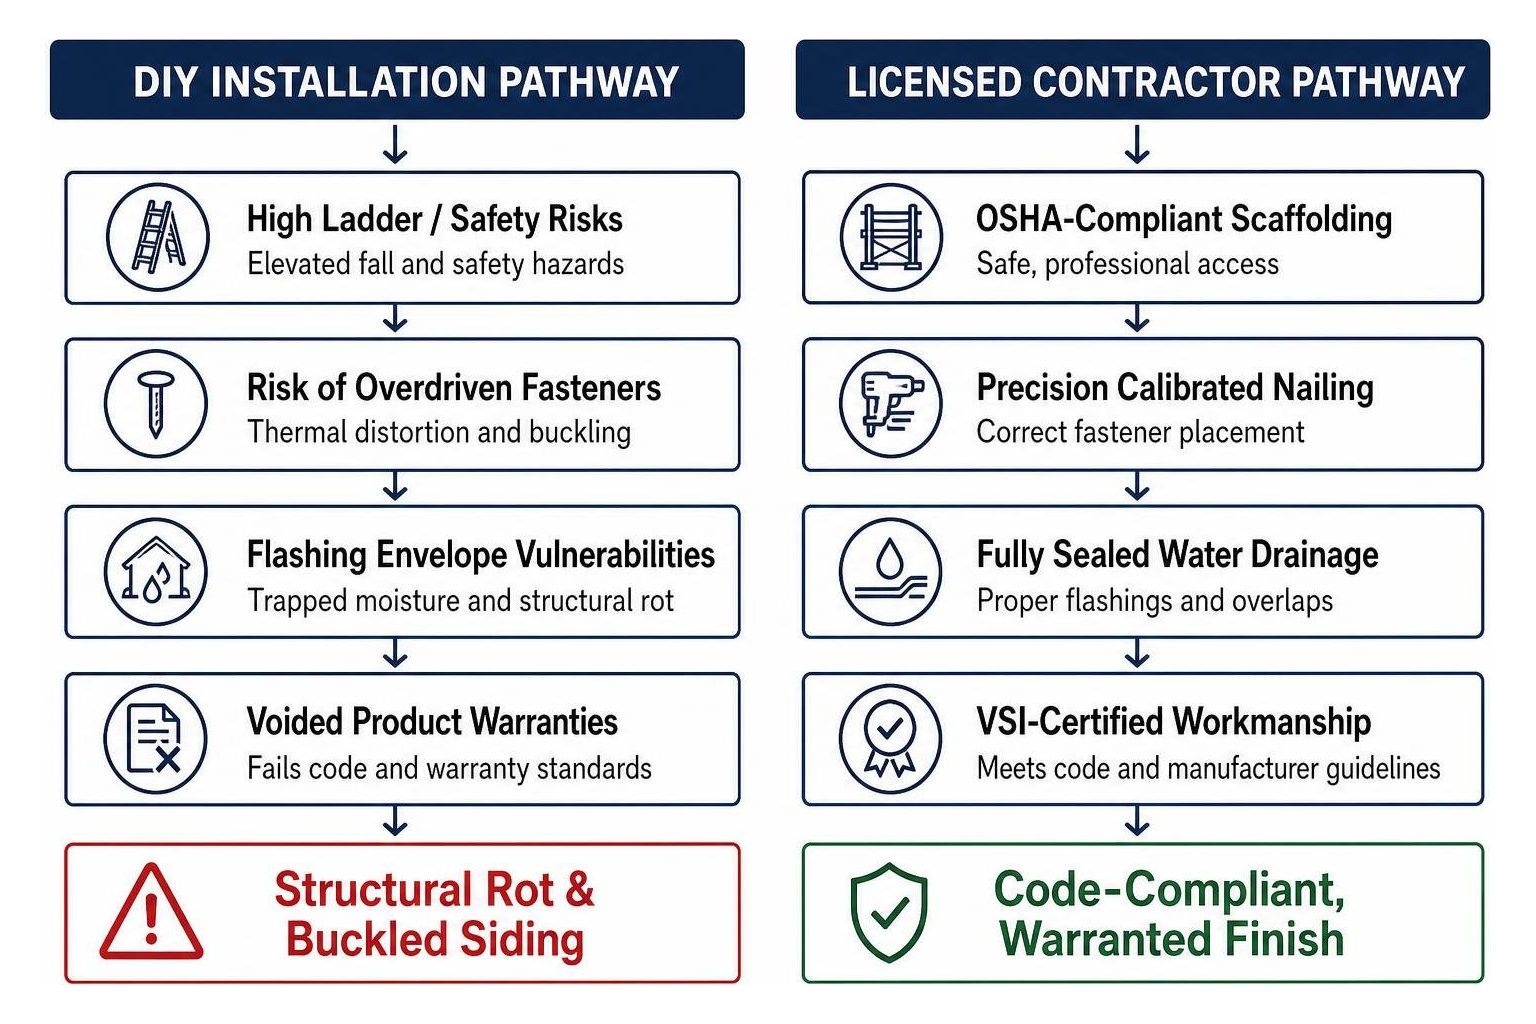
- Trapped Moisture and Structural Rot: Missing flashings, reversed J-channel drain tabs, or improper housewrap overlaps let water seep behind the siding. Because vinyl panels trap ambient humidity against the sheathing, hidden water leaks can rot structural framing, ruin batt insulation, and cause mold growth within wall cavities long before exterior damage becomes visible.
- Elevated Fall and Safety Hazards: Siding a two-story home in Gaithersburg, MD, or Glen Burnie, MD, requires working safely at significant heights. Navigating heavy materials on extension ladders without pump jacks, wall brackets, or integrated scaffolding systems introduces serious fall risks for DIYers.
- Thermal Distortion and Buckling: Driving nails too tight, setting fasteners off-center, or leaving insufficient clearance inside corner channels prevents natural panel expansion. As summer temperatures rise, pinned panels bind, buckle, and develop permanent, unsightly ripples across exterior walls.
Why DIY Vinyl Siding Installation Often Fails Code and Warranty Standards
Building codes and manufacturer performance standards leave no room for installation errors. The International Residential Code (IRC) and ASTM D3679 establish strict design criteria for cladding systems, including water resistance, nail penetration depth, and negative wind load ratings. Exterior wall systems across Maryland must withstand sustained wind gusts and severe seasonal storms. A loose fastener pattern or missing starter lock can cause progressive panel blow-offs during high-wind events.
Furthermore, leading siding manufacturers back their products with extensive warranties—often spanning decades—that protect against manufacturing defects, excessive fading, and hail damage. However, these warranties contain strict installation clauses. If an uncertified DIY installation uses improper fastener spacing, drives nails through the panel face, or fails to follow guidelines like those in the CertainTeed Installation Guide, the manufacturer will void the warranty. Homeowners are then left with zero financial protection when panels warp, crack, or fail prematurely.
The Value of Professional Craftsmanship and Warranties
Hiring a licensed, insured exterior specialist eliminates the safety risks, structural vulnerabilities, and costly missteps common to DIY projects. Professional siding crews bring specialized equipment, such as pump-jack scaffolding and calibrated pneumatic siding tools, that allow them to complete installations efficiently, safely, and to exact manufacturer specifications.
Licensed professionals know how to assess underlying structural sheathing, correct wall plane deflections, integrate moisture barriers, and tailor expansion tolerances to the local climate. When you hire a quality contractor, you protect your home with written workmanship guarantees that complement the manufacturer’s materials warranty. This provides lasting structural protection and long-term peace of mind.
Frequently Asked Questions About Vinyl Siding
How much expansion gap should be left during installation?
When installing vinyl siding in temperatures above 40°F, leave a 1/4-inch expansion gap at all accessory junctions, including inside corners, outside corners, and J-channels. If installation occurs in temperatures below 40°F, increase this expansion gap to 3/8 inch. Vinyl panels contract significantly in cold weather; this added clearance prevents panels from expanding against corner stops and buckling during hot summer months.
Can vinyl siding be nailed tight against the wall?
No. Vinyl siding must never be nailed tightly to the wall substrate. Fasteners must be driven straight into the center of the pre-punched nailing slots, leaving a 1/32-inch gap (roughly the thickness of a dime) between the fastener head and the vinyl hem. This clearance allows the panel to slide freely along its horizontal axis as it expands and contracts with changing ambient temperatures.
How do you cut vinyl siding cleanly without cracking it?
To achieve clean cuts without cracking the vinyl:
- Use compound-action aviation snips for vertical profile cuts and detailed notch work, taking care not to fully close the blades at the end of each stroke.
- Use a utility knife to score the flat face of panels along a straightedge, then snap the vinyl cleanly along the scored line.
- For cross-cutting full panels, use a circular saw fitted with a fine-toothed plywood blade mounted in the reverse direction, moving the saw slowly across the panel face.
Conclusion
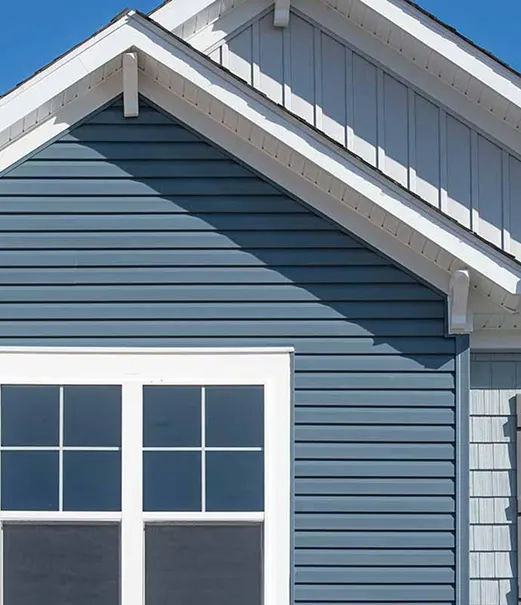
A successful home exterior transformation requires balancing design preferences with sound structural engineering. While modern vinyl cladding delivers exceptional curb appeal, thermal performance, and low maintenance, its long-term durability depends entirely on what happens behind the panels. The technical demands of weather-resistive barriers, flashing integration, and thermal expansion tolerances make a whole-house siding installation far more complex than a standard weekend DIY project.
For homeowners across Prince George’s County, MD, Howard County, MD, and surrounding regions, partnering with experienced exterior specialists protects your property’s value and structural envelope. The team at Top Quality DMV brings dedicated craftsmanship, energy-efficient solutions, and transparent, detailed estimates to every siding, roofing, and window replacement project. Investing in professional installation backed by comprehensive warranties ensures your home remains structurally protected, energy-efficient, and visually stunning for decades to come.